
Create and Reset SSH authentication
On a fine day while nibbling my favorite cookie came the shock of my life. My laptop screen was wiped out! Being a person who takes backup for a backup (well, right! you spot the bordeline psychopath), I didn’t suffer a big loss, however, one thing i missed was that, I lost the encrypted private key to Azure virtual machine stored in my local. In this article, I will show how I got control over the VM despite the lost key. If you already know how to create RSA encrypted key for your VM and looking only for resetting the SSH key, dive straight to the last section of this article.
Please note, SSH key generation is common for all types VMs (You can use cloud subscriptions, or Multipass) and the reset of SSH key is written exclusively with Azure VM in mind.
RSA Encryption for the linux machine
The SSH protocol uses public key cryptography for authenticating hosts and users. Follow the below steps to secure your virtual machine.
Here my host machine is Windows 11 and guest machine (VM) is Linux Ubuntu distro 22.04.
-
The authentication keys, called SSH keys, are created using the
keygenprogram. Run the below command within your guest machine. We have used 4096 RSA encryption. More on here. Note that this step can be done from your host machine too, just place the right files at right place.~/.ssh$ ssh-keygen -t rsa -b 4096 -
At this step, you will be asked for file name to save the key, just press
enterto use the default name. - It will now prompt you to enter passphrase.
A secure passphrase helps keep your private key from being copied and used even if your computer is compromised.
-
Inside
.ssh/, check if private and public key pair is generated. We will have three files namedid\_rsa, id\_rsa.pub and authorized\_keys
-
Append contents of
id\_rsa.pubintoauthenticated\_keys. Let’s pay extra attention here! Make sure to not change any contents on both files and not leave any blank or extra space while you do that.cat id\_rsa.pub authorized\_keys - Cut
id\_rsaprivate key and paste it into your host machine on the pathhome-path\.ssh\.
Once the public key has been configured on the server, the server will allow any connecting user that has the private key to log in. During the login process, the client proves possession of the private key by digitally signing the key exchange.
Connecting Guest machine from the Host
Now, let’s try ssh-ing into the guest from our host machine
ssh username@guest-ip-addr -i .\.ssh\path-of-your-private-key
That’s it, you gave ssh-ed into your machine!
To make life easier, let’s create a new file named config inside .ssh/ in your host machine and enter the below details:
    Host some-name-to-ssh
        HostName guest-ip-addr
        User username
        IdentityFile ~/.ssh/path-of-your-private-key
Hence, from now on, just do
ssh some-name-to-ssh
Remember, the above command will ask for passphrase given at the time of key generation.
What is known-hosts?
The known host files (/etc/ssh/ssh_known_hosts and $HOME/.ssh/known_hosts) is a client
file containing all remotely connected known hosts, and the ssh client uses this file. This file
authenticates for the client to the server they are connecting to. The known _hosts file contains
the host public key for all known hosts.
If the remote server has a new IP, then the new IP and the key will be added to the known_host
file on the OS that you are trying from to access the remote.
Reset SSH public key
Below are the steps to reset the SSH public key of your Azure VM.
-
Generate a RSA key (preferably 4096) from your local machine. Don’t worry if your local and cloud machines do not have similar operating systems. Now we have our new public key
id_rsa.pubin our local machine generated at~\.ssh\id_rsa.pub. Let’s copy that.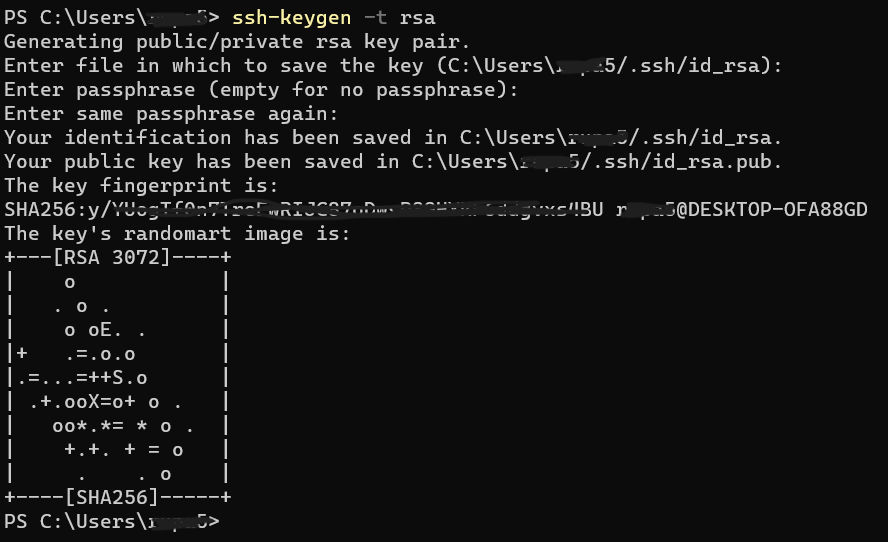
-
Sign in to Azure portal, and choose the respective VM. Under support+troubleshooting tab, select reset password.
-
Create an username (an existing or new one). Since we are trying to access the VM with the old username, let’s enter the exising username.
-
Paste the copied public key into the
SSH public keybox.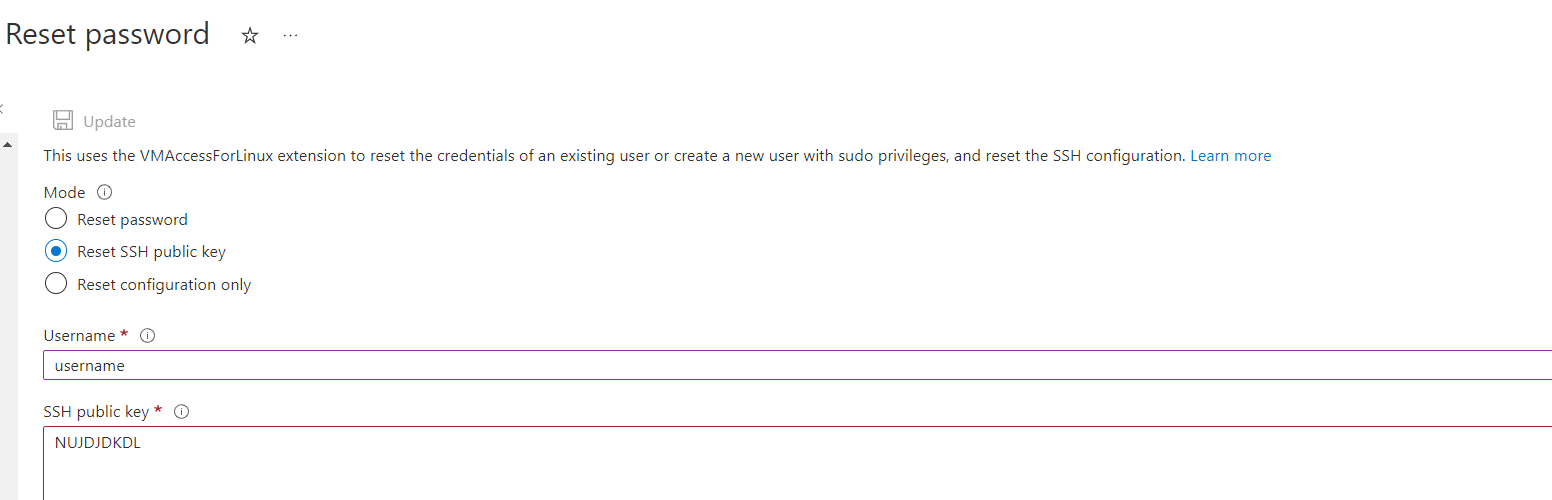
-
Now, delete the public key stored in your local machine.
-
Try to ssh from the windows with the private key. IP address of the VM will be available in the azure portal.
ssh -i C:\Users\funko\.ssh\id_rsa azureuser@ip-addr -
This may be quite frustating to
sshwith a lot of details everytime. So let’s add username, host and private key path details to the config file and just dossh your-vm-name-in-config-file
That’s it! Congratualtions for securing your VM!